
Introduction to Wetsuits
Finding the right size wetsuit can sometimes be quite time consuming , especially for a first time buyer. With wetsuits fitting to the body like a second skin, it can sometimes feel that its tough to understand whether the wetsuit is the right fit or whether you need to try an alternative size. If you are unsure how to get that perfect fitting wetsuit then this is the blog for you – we can help you find your next wetsuit whether you are looking for triathlons or any open water swimming activity.
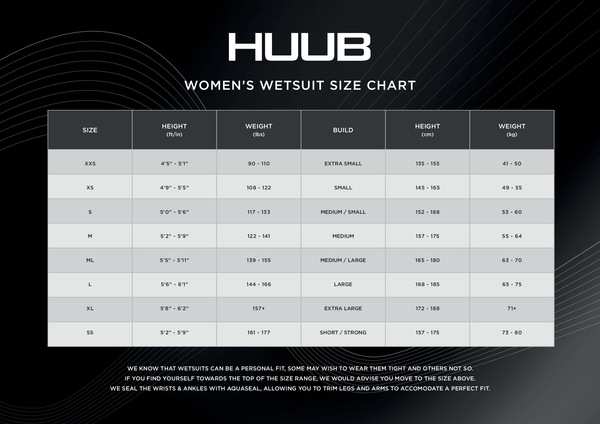
Finding your Wetsuit size
Now this may seem like an obvious place to start, but referring to the size guides are an excellent tool to begin. Start by measuring your current weight and height, our bodies go through a lot and are always changing so by having accurate and current measurements you will be able to find which size range is suited to your body’s current form. If you land between two sizes, or you’re at the top of the size range and are unsure which would be best suited to you then we would always advise sizing up, wetsuits are already designed for a tighter fit without restricting your range of movement therefore its best to accommodate for this by sizing up.
Once you have fitted the wetsuit its now time to determine whether that is the best fit. A simple way to do this, beyond opinion based on personal preference, is to look at how the suit sits on the body, ifs its too big you will notice that the wetsuit is baggy around the back, arms and legs (behind the knee) and it will ride up when performing dry land stroke actions. Contrarily, if the wetsuit is too small you will feel too much resistance/pressure when performing your dry land stroke, with the material feeling as though it is pulling down on your shoulders with no slack or room for adjustments.
When sizing up your wetsuit, its also worth considering what base layer you intend on wearing, whether you plan to wear a swimsuit, trisuit or combination; or if you are going to wear any other underlayers such as a neoprene vest. No matter what you intend on wearing, you would be best to try your wetsuit on whilst wearing all of your desired layers as you intend to wear them during you swim.

Understanding thickness and buoyancy
Wetsuits are designed to create a layer of insulation, keeping the user warm whilst creating as little drag as possible. To make it happen, wetsuit thickness is designed to not only increase the warmth of the wetsuit, but to assist the wetsuits buoyancy and ability to float. There are many wetsuits where the neoprene will be of equal thickness, but HUUB wetsuits will often be marked as
upper body thickness:lower body thickness
As an example, a 3:5 wetsuit would be 3mm upper body material thickness and 5MM lower body thickness. This type of wetsuit is particularly great for men that need additional buoyancy in the lower body.
A 3:3 wetsuit is designed for women, who are naturally more buoyant, to keep their body level equal and streamlined in the water without the feeling of being too high and unbalanced.
Different suits are made with different thickness and buoyancy, be sure to check what your wetsuit thickness is before purchasing!
Fitting
First thing to note is that it can take up to 30 minutes to fit a wetsuit. This seems a little extreme but the reality of finding the perfect wetsuit is that it needs to fit in all of the right places and in order to find that fit, there are a number of key points to cover.
Wetsuits are designed to fit tight. Now I know we have previously mentioned this, however its worth reiterating it due to its level of importance. A wetsuit fits like a second skin to allow for the swimmer to stay warm, insulating body heat whilst being unrestrictive and reducing drag. Having a poorly fitted wetsuit will not fit its purpose and would undeniably be a waste of your money, and none of us want that.
How to fit
By now you would have taken your measurements, referred to the size guide and now you’re ready to begin fitting.
Start with the legs, put both feet into the wetsuit and pull over the ankles. Proceed to pull the wetsuit up in increments: first to the shin, then to the knee, then to mid thigh and finally up to hips; by gradually pulling up the wetsuit you are preventing any damage by not overstretching the fabric and damaging the wetsuit.
Next, pull the body of the wetsuit up to cover the chest then, one arm at a time, put your arm into the sleeve, pulling it so the armpit fabric is in place. Then you can adjust the wetsuit so that the collar fabric is sat comfortably around the neck. If your collar area is too tight it can restrict your breathing; if it is too loose then it can cause drag while you are swimming. With this in mind, its worth noting that the collar of your wetsuit is also designed to fit close, but will stretch over time. If you are concerned with any rubbing then wetsuit lubricants can be a great solution.
Once the suit is on, we need to adjust it to make it comfortable, avoiding any restrictions and releasing any pressure from around the collar. To do this, gently pull the back of the wetsuit, holding either side of the zipper tracks, this will then adjust around the collar, chest and arms.
If you need to pull the wetsuit up further to adjust for any bagging fabric around the crotch or knees then be sure not to yank or pinch your wetsuit, pull it up little by little without stretching the fabrics. If you still have an excess of fabric after adjustment it may be that your wetsuit is too large.
If your wetsuit fits perfectly across your body but you are struggling with bunched material on the arms and legs then do not threat. Many wetsuits are made with longer arms and legs and taped seams; this allows for the user to cut off the excess fabric up to the taped seams for a tailored fit, eliminating any drag from excess bunched materials. Only cut off the excess fabrics once you are certain that the wetsuit fits across the body.
After care
After spending all of that time finding the right wetsuit, fitting it correctly and then partaking in your chosen swimming activity, its now time to take it off.
Unzip the wetsuit, in most instances you will be able to pull the chord straight down releasing the zipper. If you have a HUBB wetsuit with a breakaway zip such as the Araya you will need to tug the chord up to release, once you have done that you are then able to remove the wetsuit and reset the zipper.
Now to remove the suit. Reverse the application process by pulling the suit back off of the chest, removing your arms from the sleeves then taking the wetsuit down to the hips, gradually taking the wetsuit down from the legs at each point until it can be removed.
Once removed, rinse the wetsuit after use simply by using tap water – no cleaning solution needed. This will remove any debris and elements which could damage the fabric. In the interest of keeping the wetsuit in mint condition, do not wring it out dry it over any heat or in direct sunlight as this eroded the neoprene. Dry the wetsuit inside out, on a hanger or draped over a drying rack then gently press the remaining water out to aid the drying process.
Once the wetsuit is dry, fold or hang wetsuit keeping the fabric as flat as possible, not scrunched or creased. Many wetsuits come with a storage bag to help protect the fabric from dust and scuffs.